Print engineering drawings & blueprints at home
Printing a technical drawing at home comes down to one number: 100%. A floor plan drawn at 1/4″ = 1′ is only useful if a quarter inch on paper really is a scaled foot — let the printer rescale it even slightly and every measurement anyone takes off the print is wrong. The good news: only two settings ever break scale, both are avoidable, and a tiled print from a $60 inkjet can measure exactly as true as one from a plotter.
Scale survives only if every page prints at exactly 100%; avoid Fit to page and any driver scaling, and measure one test page before printing the rest.
On this page
The two silent scale killers
Killer #1 is "Fit to page." Many print dialogs default to "Fit to printable area," which shrinks the page about 4–6% so the content clears the printer's unprintable border. The print looks identical to a correct one — same drawing, same layout — but a 100 mm callout now measures roughly 94–96 mm. It has to be off for every sheet, every time. One sheet printed with fit-to-page in the middle of a tiled set also refuses to line up with its neighbours.
The second is a paper-size mismatch. A PDF laid out for Letter, printed on A4 — or the reverse — forces the printer driver to rescale or crop. Letter is 215.9 × 279.4 mm; A4 is 210 × 297 mm. Close enough that the print looks fine, different enough to shift scale by a few percent in each direction, and by different amounts horizontally and vertically. Make the paper size in the print dialog match the size the tiled PDF was built for, and check it again after any driver update resets your defaults.
Verify scale before you trust the print
Never assume the settings held. When the first sheet comes out:
- Find the drawing's graphic scale bar, or a known dimension — title blocks and dimension strings both work.
- Measure it with a steel rule. A 1:1 print of a 100 mm callout must measure 100 mm; allow half a millimetre for paper handling, no more.
- Diagnose any error by its size: off by roughly 5%, that's fit-to-page; off by an odd asymmetric amount, that's a Letter/A4 mismatch.
- Fix the setting, reprint the single test sheet, re-measure. Only then run the full set.
Thirty seconds with a ruler is cheaper than a cut list built from a 96% drawing.
Sheet-count math: what a drawing costs in Letter pages
ANSI sizes double just like ISO sizes, so the tiling arithmetic is clean — in theory:
| Drawing size | Dimensions | Letter sheets (theoretical) | Grid |
|---|---|---|---|
| ANSI B (Tabloid) | 11″ × 17″ | 2 | 2 × 1 |
| ANSI C | 17″ × 22″ | 4 | 2 × 2 |
| ANSI D | 22″ × 34″ | 8 | 4 × 2 |
| ANSI E | 34″ × 44″ | 16 | 4 × 4 |
Those counts assume edge-to-edge printing, which home printers can't do. At true 100% scale with real margins, the grid gains a row or a column — an ANSI D typically lands around 12 Letter sheets rather than 8, and overlap adds a little more. Let the tool compute the honest number: paper is cheap, and shrinking the drawing to hit the theoretical count defeats the whole exercise. If your printer takes Tabloid or A3 stock, use it — sheet counts drop by half and you handle half the seams.
Tiling the PDF without losing line weight
Drawings almost always arrive as PDFs, which is lucky: CAD exports keep linework as vectors, and Free Image Splitter renders the page at 2× zoom before tiling, so hairlines and hatching stay black-on-white instead of going grey and fuzzy. Drop the file in; for a multi-sheet set, the "PDF page" dropdown selects which sheet to tile.
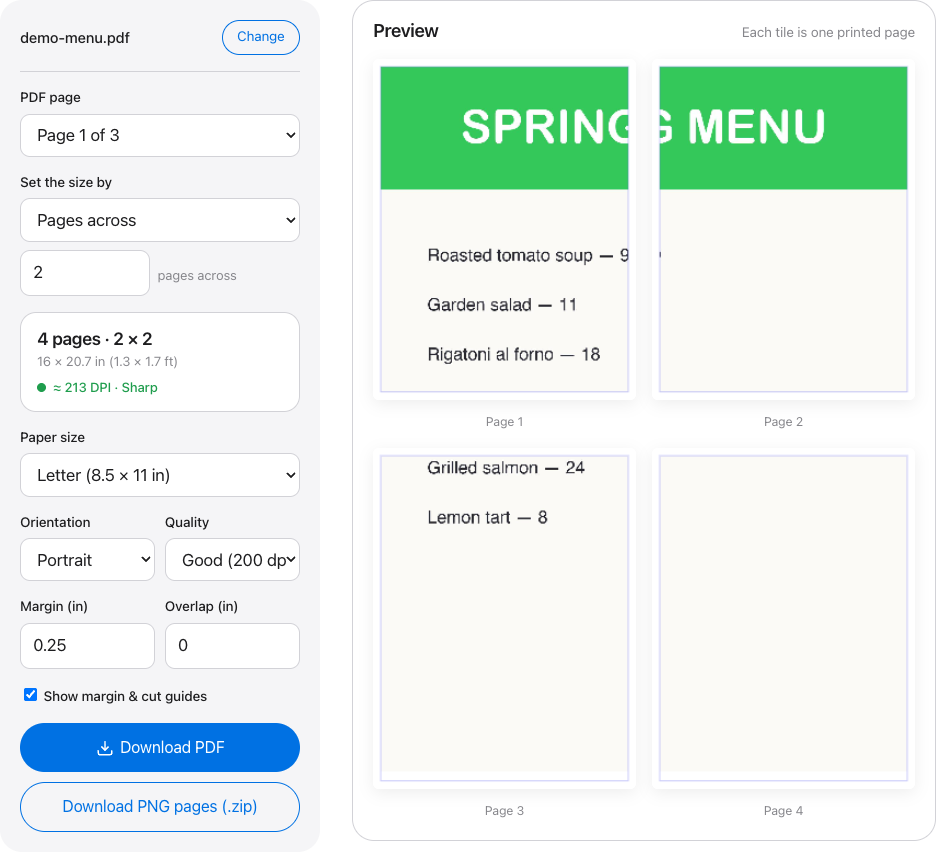
For accuracy, size by dimension, not by page count: pick the "Width (inches)" driver and type the sheet's true width — 34 for an ANSI D — so the output is dimensioned rather than approximated. On the DPI preset, 150 is genuinely enough for line art; CAD lines are high-contrast and don't need photo resolution. Step up to 200 for dense hatching or shaded fills. Confidentiality note for anyone tiling unreleased designs: the render is 100% client-side, so the drawing never leaves your machine.
Overlap keeps dimension strings continuous
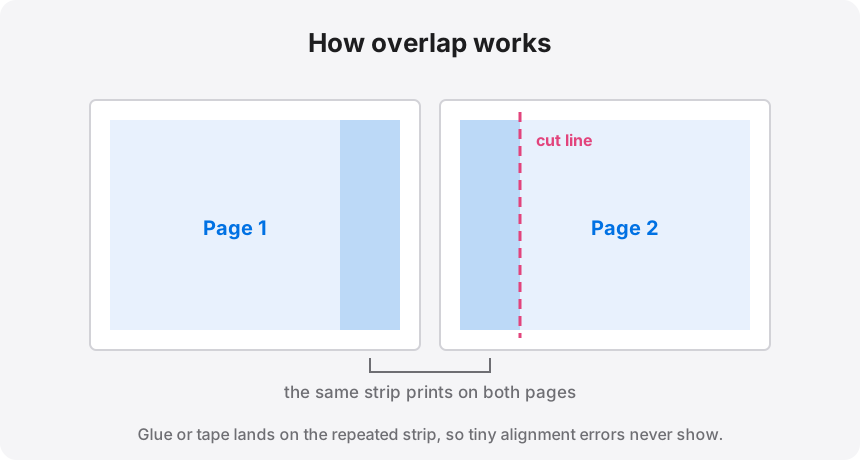
The worst place for a page break on a drawing is mid-dimension: a 3,450 mm string that dies at a sheet edge is an invitation to misread it. Set about 0.5 in of overlap. The repeated strip means every dimension line, leader, and grid bubble appears complete on at least one tile, and the printed cut-line guides show exactly where to run the blade during assembly.
Print a torture test first
Before committing to all 12 sheets, find the densest tile — the corner with the tightest hatching or the smallest annotation text — and print that one alone at Best quality. If 2.5 mm text reads cleanly and adjacent hatch lines stay distinct, run the set. If they smear together, bump the DPI preset to 200 and check the printer isn't in draft mode; thin-line trouble is nearly always a quality setting or a tired cartridge, not the source file.
Last caveat, because it matters: a home-tiled print is a working copy. Anything headed for a permit office or a construction site still needs sealed drawings from a licensed professional. Label scaled or reference prints accordingly.
Tile a drawing at true scale
Load the CAD PDF, type the sheet's real width in inches, and print every tile at 100%. The drawing renders entirely in your browser — nothing uploads.