How to print photos larger than your printer size
A 12-megapixel phone photo carries enough resolution for a 20 × 15 inch print — more than three Letter sheets' worth of paper from a camera that lives in your pocket. The pixels were never the problem; the paper tray is. Splitting the photo into a grid of ordinary sheets, printing each at full quality, and joining them gets you the wall-size print without a wide-format printer. Photos punish sloppy tiling far more than banners or signs do, so this guide covers the photo-specific parts: paper finish, ink consistency across pages, and keeping seams out of skies and skin.
A 12-megapixel phone photo carries enough pixels for about a 20 × 15 inch print; split it into a grid, print each page at 100%, and join them.
On this page
Your camera already shot big enough
Divide pixel width by 200 — a solid DPI target for photos on a wall — and most modern cameras clear surprisingly large sizes:
| Camera | Pixels | Print size at 200 DPI |
|---|---|---|
| 12 MP phone | 4032 × 3024 | ≈ 20 × 15 in |
| 24 MP camera | 6000 × 4000 | ≈ 30 × 20 in |
| 45 MP camera | 8192 × 5464 | ≈ 40 × 27 in |
Watch for the things that quietly eat pixels: cropping (a 50% crop halves your printable width), digital zoom (a crop with better marketing), and anything that traveled through a messaging app — WhatsApp and iMessage hand around recompressed, downsized copies. Always print from the original in your camera roll or catalog, never a forwarded version.
Confirm the specific photo, not the spec sheet

When you load a photo into Free Image Splitter and set a print size, a live readout reports the page count, final dimensions, and effective DPI, graded green (200 and up), amber (100–199), or red (below 100) based on the source file's pixels per printed inch. For photos, aim for green when people will stand close, and treat amber as acceptable for prints viewed from across a room. If a treasured shot grades red at the size you want, the homepage upscaler can smooth the enlargement — but with photos, printing one size down usually beats resampling.
Matte paper, specifically
For a single-sheet photo, glossy versus matte is a matter of taste. For a tiled photo it isn't: gloss reflects light at the seam angles, so every joint catches a highlight and announces itself whenever someone walks past the print. Matte photo paper scatters light instead, and in my prints the difference at the seams is dramatic — joints that jump out on glossy all but disappear on matte. It also tolerates tape and handling better during assembly. The full comparison is in the paper guide; the short version for tiled photos is matte, 200 gsm or heavier.
Print the whole set in one sitting
Ink cartridges drift. A set of tiles printed half tonight and half on Thursday can come out with a color step where the two sessions meet — a slightly warmer sky on pages 5 through 8 is exactly the kind of mismatch the eye catches instantly across a seam. Keep the set consistent:
- Print all pages in a single session, on paper from the same pack.
- If a cartridge is running low, replace it before the run, not partway through.
- Set scale to 100% / Actual size on every page — "fit to page" rescales tiles unevenly and the grid won't line up.
- Let pages dry flat for 10–15 minutes before taping. Fresh inkjet ink offsets onto whatever touches it, including the back of the neighboring tile.
Skies and skin give seams away
Seams vanish into busy texture — foliage, buildings, fabric — and glare out of smooth gradients. In a portrait, a joint through a cheek is unmissable; in a landscape, a joint through clear sky is nearly as bad. Two moves help. First, pick the page count and print width so the joints land in detailed regions where possible; nudging the width by an inch is sometimes enough to move a seam off a face. Second, use the overlap setting (up to 2 inches) so adjacent tiles share a strip of image — then cut the joint along a natural edge inside that strip instead of through the middle of a gradient.
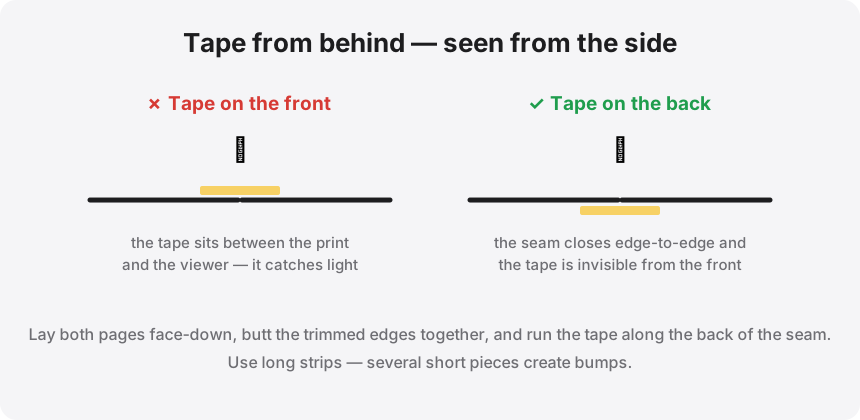
However you place the joints, tape them from the back. A strip of tape on the front creates its own reflective seam — you'd be trading one giveaway for another.
Mounting: where tiles become one print
Assembly decides whether the result reads as a big photo or as pages taped together. Mounting the assembled print on foam board with spray adhesive pulls every tile into one flat plane, removing the small height differences that cast shadow lines along joints. Behind glass the effect compounds: a matte tiled print, flattened on board and framed, reads as a single continuous photograph from about 3 feet. Skip the mounting and the seams stay findable; add board and glass and people stop looking for them.
See how big your best photo can go
Drop a photo in, pick the size you want on the wall, and the DPI readout tells you whether it holds up — before you print a single page.