How to print a PDF as a multi-page poster
A PDF is the best file you can feed a poster tiler, and most people don't realize it. Text and line art in a typical PDF are stored as vectors — drawing instructions, not fixed pixels — so the page can be rendered at whatever resolution the print job needs. Free Image Splitter leans on that: it rasterizes your chosen page at 2× zoom before splitting, which turns an ordinary Letter-size page into a 1700 × 2200 px source. On most poster sizes, that lands the sharpness readout squarely in the green.
A vector PDF is the best poster source there is: the splitter renders your chosen page at high resolution before tiling, so text and lines stay crisp at any size.
On this page
PDF or JPEG? It changes what your poster can be
A JPEG ships with a fixed pixel count. If your image is 1600 px wide and you spread it across a 32-inch poster, you get 50 DPI, and no tool on earth can invent the missing detail. A PDF with vector content has no such ceiling for its text and shapes: a flyer built in Canva, a menu exported from InDesign, a poster laid out in Word — all of them re-render cleanly at 2× and survive enlargement far better than a screenshot of the same design ever could.
The gap shows most on small type. Photos degrade gracefully when enlarged; 9-point body text does not. If a design exists as both a PDF and an image export, always tile the PDF.
Loading a PDF and picking a page
Drag the PDF onto the drop zone exactly as you would an image. Single-page files render immediately. When the file has more than one page, a "PDF page" dropdown appears under the filename in the left panel — switch it to "Page 2 of 3" and the preview re-renders with that page as the source. Only the selected page gets tiled; the rest of the document is ignored.
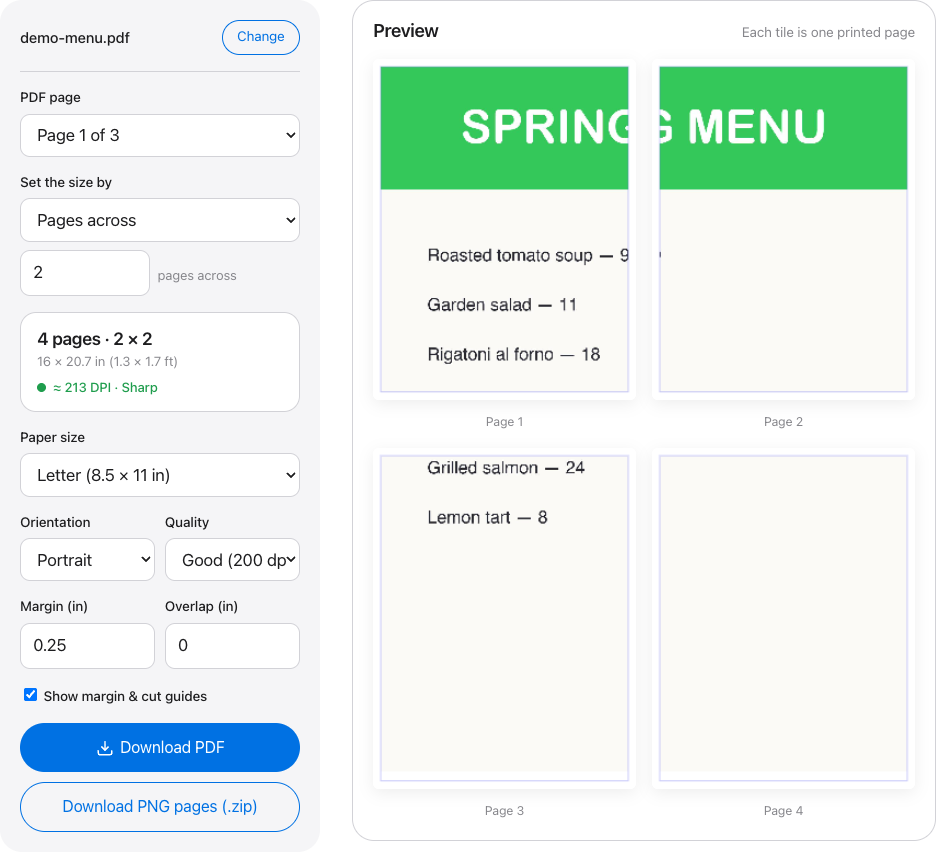
Keep an eye on the readout line beneath the controls. In the screenshot above, a Letter-size menu page split 2×2 comes out at 16 × 20.7 inches and roughly 213 effective DPI. Green (200 or more) holds up at reading distance; amber (100–199) is fine across a room; red means the enlargement outran the source.
Worked example: a menu page at 2×2
Suppose I want that demo menu at window-display size. Here's the whole configuration:
- Load
demo-menu.pdfand leave the dropdown on Page 1. - Set Pages across to 2. The tool adds the second row on its own to keep the page's proportions — four tiles total.
- Keep Letter paper, portrait, 0.25 in margins.
- Add 0.5 in of overlap. Interior edges get a repeated strip plus a printed cut line, which makes taping forgiving instead of fussy.
- Export as a multi-page PDF — four sheets, in reading order.
Setup takes under a minute. The printer will spend longer on the job than you spend in the tool.
Several pages, several posters
A multi-page PDF doesn't export as one combined mega-poster, and you wouldn't want it to. For a 3-page menu the loop is: select Page 1, export, switch the dropdown to Page 2, export again, repeat. Each export is a self-contained tiled PDF, so rename them as they land — menu-p1-tiles.pdf, menu-p2-tiles.pdf — before three identically named downloads blur together.
The exception: scanned PDFs
A scan is a photo wearing a PDF coat. There are no vectors for the 2× render to sharpen — only the pixels the scanner captured — so a 200 DPI scan blown up to poster size behaves exactly like a low-resolution JPEG. The readout flags this immediately: instead of green you'll see amber or red at the size you wanted.
Amber is a judgment call — print smaller or accept some softness. Red is a stop sign: rescan the original at 300–600 DPI, or hunt down the born-digital file the scan was made from.
Bigger paper, fewer seams
Letter and A4 are the defaults, but the splitter supports Legal, Tabloid, Ledger, Executive, Folio, and the A5/A3/B5/B4 sizes too. If your printer takes Tabloid (11 × 17 in) or A3 stock, use it for PDF posters: the same 2×2 Letter layout collapses to just two Tabloid sheets, which means one seam to align instead of four edges. Fewer seams matter more on PDFs than on photos, because a taping error through a line of text is far more visible than one through a sky.
Print settings that keep the sharpness you paid for
Export the multi-page PDF rather than the PNG ZIP when you're printing directly — one file, one print job, tiles already in order. Then, in the print dialog, set scale to 100% / Actual size, every time. "Fit to printable area" re-shrinks each tile by a few percent, and shrunk tiles no longer meet at the seams. Match the dialog's paper size to what you chose in the tool, and run the first two tiles in draft mode to confirm alignment before spending ink on the full set.
One more thing worth knowing for client proofs and unreleased designs: the rendering happens entirely in your browser. The PDF is never uploaded anywhere.
Turn a PDF page into a wall-size print
Drop in a PDF, pick a page from the dropdown, and watch the DPI readout confirm it'll print sharp before you commit a single sheet.